Hello friends!
It’s one of my favorite times of the month.. time for another DIY Challenge! A few of my blogging friends and I come together each month and challenge ourselves to all create something from the same item. Last month’s challenge was “scrap wood” and I shared this handy little thing that was quite popular among my readers!
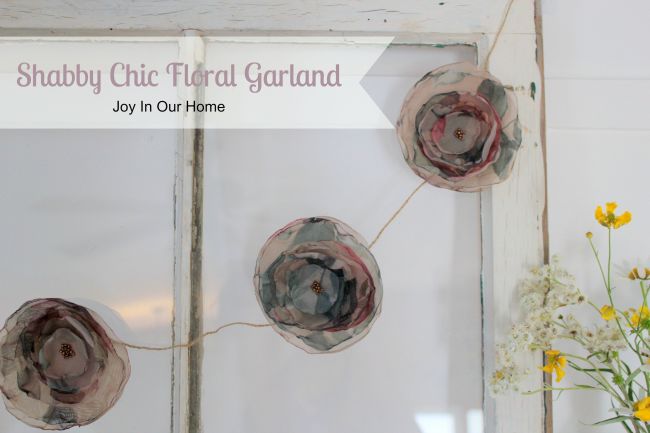
I was a little nervous when I saw the theme for this month… fabric. If I had my mom close by, I would have all kinds of fabulous Pinterest-inspired things I could create…. with Mom doing the sewing of course! I don’t know about you, but this girl has hardly spent any time indoors this summer! From soaking up rays at the beach, to camping at the lake and just being outdoors in general, it’s left me with very little time inside… and time to create. However, I’d love to share this pretty but simple garland I created using things I had on hand!
 Here’s what I used to make the flowers (this is for one flower only).
- chiffon material (if you’re fabric store has a remnant bin, be sure to check it)
- 2 circles, 10 cm wide
- 2 circles, 8 cm wide
- 3 circles, 5 cm wide
- beads or other decorative button for center
- invisible thread and needle
- twine to attach the flowers to
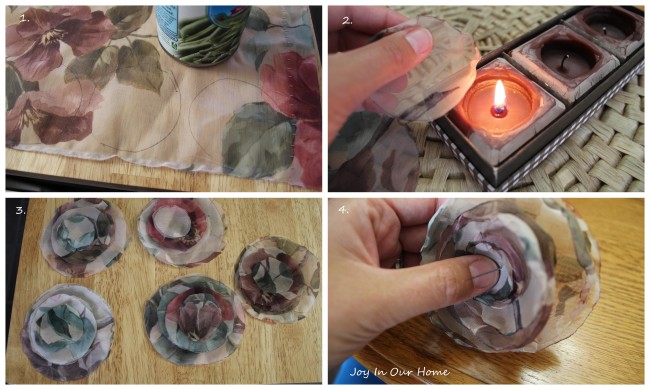
1. One little suggestion I’d like to share with you is that fabric shears make cutting fabric soo much easier! So quick! Especially when you’re cutting out 35+ circles! The great thing about making these flowers is you don’t have to use the exact measurements I gave you. Look around your home and find things you can use to trace. Canned goods from the pantry work great and so would round smaller bottles. Using a sharpie, I traced some circles onto my fabric. Don’t worry about leaving a mark, as you’ll see later on that it’ll disappear.
2. For singing the edges of your circles, you’ll need a tea light candle or some other candle without sides. There are plenty of tutorials floating around Pinterest for this so I won’t go into great detail on how to do it. Very carefully, hold your circle over the flower so it starts to “curl up”. Go quickly around all the edges.
3. This shows my stacks of circles before they’re singed! Depending on how stacked or full you want your flowers to look, add more circles to your piles.
4. Using invisible thread and a needle, stitch your flowers together at the center. I then added a tiny glob of hot glue and added some little gold beads to complete them!
Super easy and cute! I hot glued them to my twine and was done!
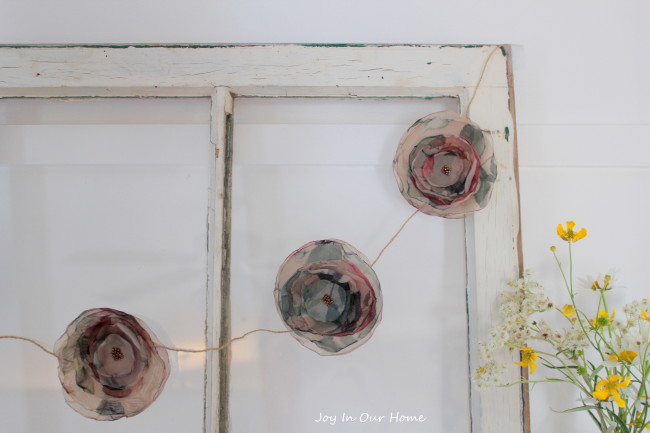
I absolutely love our Boxwood Wreath I made last year and it had been hanging on this old window ever since! I decided to change things up a little bit and add this garland instead.
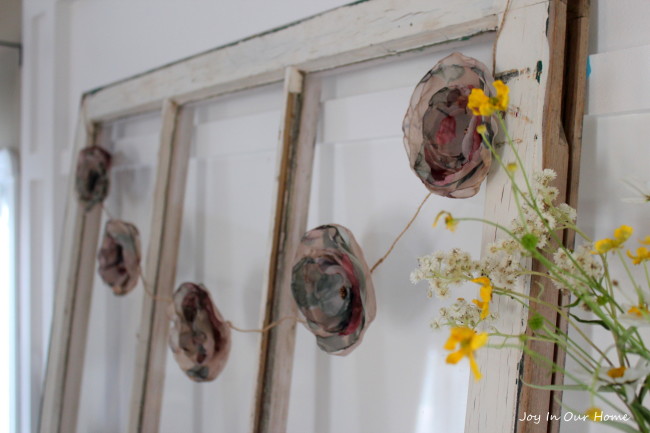
I love the combination of colors… reminds me of fall!
Be sure to check out all the amazing things my friends created! So much pretty and beautiful creations!
Also, I’d like to share one more thing before you go! Our monthly DIY challenge group has a group Pinterest board where we pin and share all our projects. We’ve decided to open the board to other bloggers so if you’re a blogger and would like to join this board, check it out here. We’d love to have you join us!
Thanks for stopping by and have a great day!
-Kendra
          |
Seriously Kendra you are sooo crafty!! I LOVEEEEE this idea & it’s genius !! Happy Wednesday friend!!
Paige.Rose
from
http://www.TheQuaintSanctuary.blogspot.com
You are too sweet, Paige! Thanks SO much, friend! xo And happy Wednesday to you as well!!!!
This is a really cool way to make flowers Kendra! I never would have thought to use heat!
Thank you, Nicole! Heat is perfect for “sealing” the material (and also ribbon!) so it doesn’t fringe. 😉 Glad you stopped by!
So pretty, Kendra! Love your tips about the remnant bin, using canned goods for the circles, etc. Good job!
Thanks, Lisa!! I always appreciate your sweet comments! xo
Oh, I love fabric! That windowpane you have your rosette garland hanging from is so pretty, where did you get it?
Carrie
curlycraftymom.com
Thanks so much, Carrie! I found that window pane at an old barn sale in Montana! Just check antique places in your area and I bet you could find one Thanks for stopping by!
I just picked up some chiffon in the remnant bin the other day! This would be great way to use it!
Thanks Kendra
You’re welcome, Erin!! I love those bins… such good deals! Hope you’re having a wonderful week!
That’s really cute, Kendra! I make fabric flowers a lot, but never thought to put them into garland form. So great!!
Thanks Bre! I love making fabric flowers, too! So glad you like them
This is so cute! Definitely need to try!
Thanks, Samantha! Glad you like it! xo
SEW sweet! (get it?) 😉 LOVE it my friend!
😉 Cute! Thanks, Kristi!! Have an awesome day! xo
So simple and chic! Love it
Thanks so much, Bre!
This is so sweet and pretty, Kendra! Just lovely!
How cute is this? So creative and it looks great on your old window!
Thanks Misty! So glad you stopped by! xo
Kendra - your garland is so cute! We love it and your great tutorial! creative ideas are spinning! Hugs for a great week!
Thanks so much, sweet ladies! Your comments always make my day! Hugs back… and have a great week, too!
These are seriously so pretty and sweet! Love the light and flowy look of the chiffon. Such a great garland!
Love this! It’s so pretty, I love the look it creates when burning the edges. Great job, friend! Hope your weekend is going great!
I love this so much Kendra, it’s SO pretty! Hope you’re having a great summer still…
xo
Kendra I love this! I especially love how simple yet elegant it looks when paired with the old window frame.
Definitely a most for my home next spring!!!
Becki
Thanks so much ladies! Glad you like it! Hope you have a lovely week!
Beautiful idea!
Thanks so much, Christine… glad you stopped by! Have a great week!